Sunday, 12 May 2019

Home made transfers.Applying the transfer to your tin.


Applying a home made transfer to a tin.
 
In this our second part of our tutorial on home made transfers we come to applying the transfer to the lid of our tin.
 
The first thing we have to do is to find a blank (a tin with nothing on it) and prepare the blank wooded tin with a couple of coats of varnish. Usually this is done a few days prior to us making the transfer as it takes time for the varnish to dry. One dry the varnish is lightly sanded back with fine wet and dry paper to get a smooth surface. If any lumps or bumps,grit or debris gets behind the transfer when we apply it, this will show. So we need to be quite strict with ourselves when we prepare the tin ready for the transfer to be applied. Keep it dust and dirt free.
 
Ready to go.
Blank tin varnished and ready for our transfer.


Below we have our prepared tin with our pot of polyurethane Yacht varnish, a soft brush which will minimise the amount of air bubbles and our transfer still clinging to the food bag. The transfer is still wet at this stage from when we made it.  


Everything in place to start work.
Our ingredients gathered together.
 
 
Because the transfer is still attached to the bag we can handle it easily without too much damage. The next stage we must dry the back of the transfer. Be careful when drying the back of the transfer not to get any dust or pieces of grit etc. on it. The front of the transfer clinging to the food bag should still be wet. This will help us separate the transfer from the food bag.


Checking the transfer.
Checking the transfer after drying the back before applying to tin.
 
 
The next step once the back of the transfer is dry will be to brush on a layer of varnish to the lid of our tin. This varnish layer will be the glue that holds our transfer to the lid.


Adding the transfer,varnish the top of the tin lid.
Varnishing the top of the tin lid before adding the transfer.
 
Once a coat of varnish has been applied to the lid we then need to carefully move our transfer into place. Luckily the transfer is attached to the food bag so we don't have to touch it directly. Flip the food bag and transfer upside down so that the back of the transfer is now facing the tin lids surface.


Moving the transfer onto the tin lid.
By holding the food bag the transfer is easier to move into place without breakages.
 
The photos below shows the transfer has just been applied to the tin lid. Don't worry about the transfer being flat at this stage, as we will work through the process gradually of getting our transfer nice and smooth as we can.

Transfer with food bag still attached.
The food bag still has a role to play in applying the transfer.


Food bag on transfer.
With the food bag still in place.
 
The above photo shows a freshly applied transfer with the food bag attached on top of the transfer. The food bag has one more useful act to perform. The food bag will enable us to attach the transfer by adding pressure with our fingers to press it down.


Tapping down onto tin lid.
Using the food bag we start to smooth pat and tap down the transfer with our fingers.
 
Once we are happy with the transfer we simply and carefully peel the bag away leaving the transfer safely attached to out tins lid.


Removing the food bag.
Peeling back the food bag to expose the transfer.
 
We can smooth out the transfer a bit more with our fingers. Remember when handling a transfer and smoothing it out to use water as our fingers have a habit of sticking to the transfer and marking it or accidently dragging it somewhere its not needed. The transfer can also be very stretchy at this point and we do not wish to stretch the transfer as it can easily damage and tear it. The water acts as a lubricant  and enables us to work the surface smooth. If there are dips don't be afraid to smooth the transfer into the dip to follow the contours of the wood. These small dips add to the interest of the finished tin and make the item look more hand made.
 
air bubbles in transfer.
Starting to take shape. Now for the air bubbles.
 
The above tin shows the transfer beginning to take shape nicely on the lid of the tin. By keep adding water to the transfers surface we are able to manoeuvre it easily into the correct position and smooth out any lumps and bumps. Large air bubbles can be carefully worked along under the transfer  and forced out around the edges
 
 
Removing air bubbles.
Smoothing out large air bubbles and un-creasing transfer.
 
The above picture shows us using a stiff acrylic paint brush to help lay down any folded areas and force further large air bubbles and creases out of the transfer. Once most of the creases and large bubbles are out we need to tackle the small air bubbles.


No large air bubbles.
After smoothing out the large air bubbles.


For this job we need little more then a pin.
 
Pin to pop air bubbles.
Our tool of choice to remove small air bubbles.
 
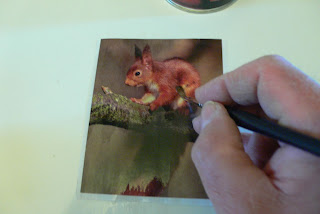
All we do here is burst the bubble with the pin to release the air and with a finger smooth down the area flat. Keep the area you are working on damp so your finger won't drag or mark the transfer.

Popping air bubbles.


Popping air bubbles.
The two pictures above shows air bubbles being popped.
 
Bursting bubbles can be time consuming but fun. Work in a small area and slowly move out bit by bit to get them all. Try to get as many as you can. The very tiny and  microscopic bubbles will probably disappear and shrink when the varnish dries. Once you are happy with the way the transfer is looking place the lid somewhere for the varnish to dry before moving onto the next stage.
 
Long edges to the transfer.
Looking at the edges of the transfer after the varnish has dried.
 
After leaving for a day or two to make sure the varnish holding your transfer has totally  dried and gone hard we can then start the next process of cleaning up the transfer. Those large overhanging pieces around the edge can now be trimmed back and sanded with fine(400 grit or finer) wet and dry paper to remove them.


Tidying up the transfer.
Once the varnish has dried I start to remove the overhanging transfer.
 
We can also now safely give the tins lid with the transfer on it a light wet sanding to get rid of any small lumps and bumps we don't want in the varnish with our wet and dry paper. It's surprising just how many small lumps and bumps a light sanding will get rid of. The finished tin will look a lot better for it. Just be careful not to sand too hard as we do not wish to cut through the transfer to bare wood.


After a light wet and dry sanding.
A very light sanding with fine wet and dry removes the last of the uneven surface.
 
The above photo shows the tins lid after a light sanding. All we have to do now is give the lid a good varnishing to seal in the transfer and protect it. About two coats between a days drying time should be enough.


Varnishing the lid.
Sealing in the transfer with varnish.
 
The above photo shows us varnishing the tins lid to seal in the transfer. The varnish we apply now will also make the colours of the tin come alive and the wood below the transfer should shine through and reflect light back in natural daylight. A most desirable effect.
 
The finished lid.
The finished lid.

The lid above has now been finished and once dry is ready to go to it's new owner.


Next weeks tutorial we will be showing you how to apply a wood veneer covering. Wood veneer covered tins opens up a whole new set of possibilities for the tin artist which is not possible with match sticks. Until next week, happy tin crafting.


Don't forget to let us know how you got on with you tin.


Sunday, 5 May 2019

Home made transfers.Making the transfer.

This is a two part tutorial on how to make and apply your transfers. This first part covers the making of the transfer, applying the transfer to the tin will be covered in part two. Please read both before trying this technique.


Home made transfers.
One of the most commonly seen forms of decoration on a tobacco tin are transfers.
Nearly all of these transfers are non commercial, nearly all of them have been home made from pictures liberated from books or magazines and other sources.All we have to do is to find a picture we like that will fit onto our tin.

Below we have a selection of pictures cut from old magazines, comics, calendars, and unwanted books.


Old cut out pictures.
Cut out pictures.
 

Making a transfer is easier said then done.

In theory the process sounds simple. Find a picture and cover with varnish then remove the backing paper before apply what's left to the tin.

It works as the varnish sticks to the surface of the paper when it dries which is the printed surface, when the backing paper is removed the ink remains attached to the varnish as a transparent film.

However the paper may be very porous and soak up the varnish making the backing paper difficult or impossible to remove later in the process(comic and news paper type paper). The transfer may just break up on it's own accord whilst trying to manoeuvre  it into position due to it being fragile. Even the size of the transfer will make things difficult. The larger the transfer the more delicate it is and the more likely it will break up, (Smaller transfers are much easier to work with). Even the ink may run. Things can go wrong but as in all forms of art and craft we pick ourselves up and try again.

When it comes down to it, with practice using the technique we can get better. Most people when they first try to make a transfer will run into problems. Hopefully this tutorial will help to overcome some of them.


Making the transfer.
First we choose a picture we like. A useful hint here is to cut the picture much bigger then we need it. The reason for this is later in the process when we remove the backing paper the edges will become a little nibbled so we need to allow for a little loss of the design around the edges.


Picture,varnish,brush.
Our picture, varnish and brush.


In this case somebody wanted a red squirrel tin, so we found a picture of a red squirrel in a magazine and cut it out so its much larger then the tin we wish to use if for. The next item we need is a soft brush, a soft brush will minimise the amount of air bubbles we add to the varnish. We also have a tin of Polyurethane yacht varnish. Do not use water based varnishes as they are not strong enough for the job.


Varnish the picture.
Starting to varnish the picture.

The first step is to add a layer of our Polyurethane varnish. Then put the picture aside to dry for a day. I would suggest 24 hours to be sure the piece is dry before we add another coat. In total I tend to use  four coats of varnish on the picture which will add strength which will become important when we start to remove the backing paper. In all it took 4 coats of varnish over 5 days of drying before I even attempted to remove the backing paper.

Nobody said it was going to be a quick process in making a transfer.

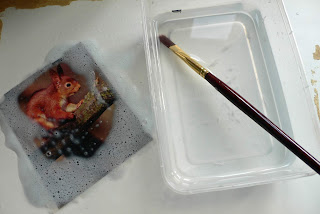
Once fully dry the next step is to start to remove the backing paper. I simply float the picture face up in a tub of water. The water will soak into the paper and start to soften it. You can quite easily leave the picture for several hours if you wish.


Soaking the picture.
Leaving the picture to soak to soften the paper.
 
Our next step is to start to remove the backing paper. Find a very smooth surface to lay your picture face down on so that the back of the piece is facing upwards. Make sure the surface you lay your picture down is very smooth and that there are no lumps and bumps under the picture. These lumps and bumps will cause the transfer to easily tear or form holes so it is vital to keep the working area spotless when we remove the backing paper.
 
Removing the paper.
Rubbing the back of the picture with our fingers to remove unwanted paper.
 
The above picture shows the process of removing the backing paper. Simply using your finger start to rub the soft wet paper slowly, eventually you will break through the surface  and rubbing and rolling the paper becomes easy. The paper often comes away in little rolled tubes. These can be easily be picked off and put in the rubbish.
 
The picture below shows the backing paper coming easily away. If the paper starts to feel dry or won't come away easily simply drop the transfer back into your tub of water so that it can soften up a bit more.
 
Peeling paper.
Backing paper peeling away easily.

The picture below shows how far we have got after several attempts to remove the backing paper. By now the picture has been in the tub soaking several times. Water is your best friend, so keep using it.
Gradually we move paper layer by layer until the transfer itself starts to poke through. This is where we need to be really careful.


Removing paper from back of transfer.
Half way there, The transfer starting to show through the paper..
 
One final good soaking in the tub to soften the last of the paper clinging to our transfer.The less paper we have supporting the picture the more fragile it becomes and it will start to fold over quite easily if we are not careful.
 
Soaking the transfer in water.
A final soak before we remove the last of the paper.
 
 
Near finished transfer.
Removing the last remnants of the paper.
 
The above picture shows the last remnants of paper being removed by hand. By now the transfer has got very thin and handling it has become a bit of a problem.
When a transfer gets this thin it will easily stick to the working surface. Keeping the working surface and transfer wet at all times will enable us to move and manipulate the transfer easily when required.
 
White chalky film.
The white chalky film on the surface to the transfer.
 
The above picture shows that the paper has been totally removed. But if you look closely you can see a white chalky surface appearing when the transfer dries. This white dusty looking layer is the coating the paper received to give it a smooth surface. It is usually a clay which could contain kaolinite(china clay), chalk or talc.
We have to remove this white filmy layer otherwise it will show up on our tin when applied.
 
Now for our secret weapon.To remove it we use a household lime scale remover and a stiff acrylic paint brush.
 
Removing the chalky film.
Items needed to remove the chalky film.
 
Simply spray the lime scale remover onto the white filmy surface of the transfer and using the acrylic paint brush in a circular motion gently brush the back of the transfer. It will quite quickly eat into the white film and remove it. The transfer will be left unharmed.
Treating the back of the transfer.
The back of the transfer sprayed with lime scale remover.
 
The above picture shows the squirrel on our transfer clearly showing through. All that we have left now is the varnish and the ink. There is no paper left.
 
Washing the transfer.
Washing down the transfer with water to see if any more white film needs to be removed.


Soaking off lime scale remover.
The final soaking to remove remaining lime scale removal chemical.
 
Now we have to remove the lime scale remover. Water remains our best friend and the transfer can either be placed back into the tub to soak or the chemical can be removed by water and brush or simply rinsed off under the cold water tap.
 
However the transfer is now very flexible and will happily and easily fold any which way it can. You will also find that it has also become very fragile around the edges. Damage seems to be unavoidable at this stage. To help manoeuvre the fragile transfer I have transferred it from the smooth working surface to a clean sandwich bag. The sandwich bag will enable me to move the transfer easily without any further damage occurring. 


Easy to handle on a food bag.
The fragile transfer has been slid onto a food bag so it can be handled without any further damage occurring.
 
Below we can see on the close up photo of the squirrel transfer nibbled edges I talked about earlier. This is one reason when we always make the transfer bigger then what we actually need it. Provided we keep the transfer wet we can easily unfold any areas and lay down the transfers  folded edges by carefully using the paint brush.
 
Transfer has nibbled and damaged edges.
Nibbled edges to the transfer.
 
The  finished transfer clinging to our sandwich bag. Notice how thin and fragile it is. This is a good transfer and clean of any paper, dirt or grit. There is no chalky residue remaining. It's rather beautiful in this state as light passes through it like a stained glass window.


Transparant transfer.
The picture from the magazine has now been turned into a transparent transfer.
 
We should still be keeping our transfer wet until the time we need to use it and apply it to our chosen tin. Water will help us to straighten out those folded over edges. Simply take our stiff acrylic painting brush and using the tip of the brush to gently rollout and flick the folded edges straight.
 
The next step for this transfer is to apply it to our chosen tin. This we will cover in part two of this tutorial which will be coming soon.


Wednesday, 24 April 2019

Wolf Matchstick work tobacco tin.

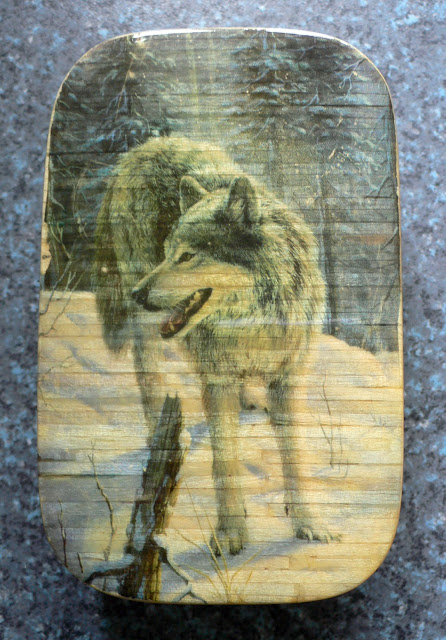
Newly finished  this week and worth showing is this Grey Wolf tin. The transfer used on its lid started life as an old calendar for 2016.The pictures were so good that it felt a pity just to throw them away. They were saved and some were used in making home made transfers one of which found its way onto this tin.


Wolf matchstick work tin lid.
The Grey Wolf on the tins lid is very striking.
 
The tin was made using the traditional matchstick method. The matchsticks on the top of the tin were laid in one direction as the transfer would cover any fancy match work. The base of the tin was given a chequerboard  pattern which reflects light beautifully.
 
Chequerboard matchstick work on base.
Chequerboard matchstick work graces the tins base. 
 
All surfaces of the tin are smooth with no rough edges with a high varnish finish. It's not perfect but then no hand crafted tins ever are.

Tutorial.The birth of a tin part 4.Simple matchwork.

In this tutorial we will start to add a wood covering to our tin. We have three ways to go about this. We could use wood veneer or the more traditional match work or a combination of the two.

Match work is the easiest of the three options so we will run with it and cover wood veneer at a later date.

Some people reading this may already be skilled in applying matches to tins and can lay them in all sorts of fancy patterns but for now we must also assume there are people reading who have never made a tin before so we will be keeping matters simple.


papered tobacco tin
The tin as we left off in our last tutorial

This is as far as we have got with our tin in the last tutorial. It has been covered with paper and lightly sanded to get rid of any lumps and bumps that may stop us laying our matches flush with the tins surface.

The next things we need are matches. Traditionally these would of been used matches either saved or recovered from ashtrays in prison for prison art tins or out of the street or gutter in tramp art. These days it is easier to go to the local toy or model shop and pick up a bag of craft matches for a few quid. At this time of writing 6,000 matches cost around £5.99 and that could be seen as expensive as there are cheaper lots out there. But 6,000 matches could easily cover 3 tins.

Glue. Many modern tin artists use all sorts of glue from 2 part epoxy like Araldite to super glues. Being traditional all we will be using is a strong PVA wood glue. PVA is cheap, clean, easy to use, and washes off easily.


Materials needed for our tin.
Items needed to start laying down the matches.


We can start to lay the matches either at the top or bottom of the tin first or the sides. Laying sides first looks better as the matches on the top and bottom of the tin  hides the ends of the matches that will be visible from the top and the bottom of the tin but it is by far simpler by laying matches across the top and bottom first.

So we will start by laying the matches in the simplest way we can, top first.

To start we mark pen or pencil lines on the lid and base of our tin using a ruler. These are just measurements taken from the top edge, they can be any measurements you like. All they do is give us straight lines to help us lay the matches straight.


Pen lines drawn onto the tins lid.
Drawing lines onto the tins lid.
 
Lines used to keep matches straight.
These lines will help to keep our matches straight.


Choosing one of our pen or pencil lines we then start to lay our matches along it. Further matches are laid along side the ones we originally laid along a chosen pen line, gradually we build out from there. 
 
matches laid staright on drawn linew
Starting to lay the matches along the centre line.
 
Simply place the glue on the tin and smear it out like in the picture above, and place your matches on the tin. Don't worry if a little glue squeezes out from between the matches, this is good and will help to glue match to match. No need to glue every match separately as it takes too long. Notice we have staggered our matches building them up like bricks in a brick wall. This will add a bit of strength to our finished tin.


Laying the matches straight.
Working out from the centre line.
  
 
The above photo shows the progress we have made on the tin lid. Laying of matches on the lid and base is a fairly quick process.
 
Covered tin lid.
The top of the tin has been fully covered.
 
Our lid has been totally covered with matches, next we turn the tin over and start to work on the base.
 
Matches on both top and bottom of tin.
Top and bottom all matched up.
 
The above photo shows both the lid and the base covered in matches. The next process will be to trim the matches back level with the sides of the tin. We need to be careful here as not to cut the matches back too far or badly cut our fingers in the process. So please be careful. Remember to cut away from you and keep your fingers clear.
 
Trimmed back matches on lid and base to tobacco tin.
Matches trimmed back level with the sides.
 
What I will suggest is cut the matches around the top and base longer then required then sand the remaining over hang back with sandpaper using a block to help get a straight edge. 
 
looking at tobacco tin lid.
The tin from the top.
 
 
Now we will look at covering the sides of the tin. Covering the sides is a little more tricky and we have to be more careful. Usually it involves laying a few matches then waiting for the glue to dry enough before we can lay a few more.
  
Laying of matches on the sides or our tobacco tin.
Matches laid horizontally across sides of tin but laid vertically around corners.
 
 
The above picture shows the matches being laid along the flat sides of the tin first. The corners are laid down in the opposite direction so they can easily follow the curve of the tin. Notice the pen marks on the lid which show us where the change of direction of the matches takes place. 


Matching up the tobacco tins lid.
Beginning to lay matches around the edge of the tobacco tins lid.
 
On a modern tin placing of matches along the sides of the lid is a little more tricky. Modern tins usually have two lugs which stick out quite a way. These lugs will stop us laying our matches flat. To get over this problem we cut slots into the matches to take the lugs as in the picture below.


Notched match stick.
Modern tins have lugs sticking out from the sides of the lid. Cutting notches out from the matches helps us to lay the matches flat over them.
 
The following picture shows the tin fully covered in matches. We need to carefully cut away any match that overhangs the lid or base. Again we use a sharp solid knife, and always cut away from ourselves.


Covered tin with match sticks.
Fully covered tobacco tin.
 
matches have been cut back.
Matchsticks have been carefully cut back.
 
The photo above shows the matches cut and trimmed. A useful tip here is to cut the matches slightly longer then needed so we don't cut them below the top and bottom of our tin. We will then sand the matches back along with the rest of the tin to obtain a smoother surface.
 
Sanding itself or lack of sanding all depends on what we are going to do with the final tin and how we want the piece to look in its finished form. This tin may eventually be used for ink work or a home made transfer may be applied. In this case a very smooth surface will be required as any lumps and bumps will show and distract from the finished item.
 
Filling the gaps between matches with wood filler.
Filling the gaps with wood filler.
 
Filling the gaps prior to sanding. This can be done in several ways. In the case of this tin we are using a wood filler, just be careful what colour you use and to match it with the wood you are using. Matchsticks are very close in colour to Ronseal's neutral. Simply apply and rub well into any cracks and gaps you have. The photo below shows the lid and base after filling. Wait for the filler to dry before moving on to sanding.


Gaps betwwen matches have been filled.
The gaps have now been totally filled in.


Sanding matched tobacco tin.
Materials used for sanding back the tin.
 
When sanding it is important to do a good job. For this I use a sanding block and a series of different size grit sandpapers starting with course then gradually working down to fine. It is important to get all the excess filler sanded right back, and the same time be careful to remove any old wood glue which has become smeared onto the tins surface as this will turn white under a coat of varnish and look horrible. Sanding is the key to a good looking tin.


Sanded matchstick tobacco tin.
Our tobacco tin is now ready for what ever design we wish to apply. Fully sanded and looking good.
 
Above can be seen a fully wooded tin, well sanded back and ready for what ever art work or creative spin we wish to give it. Some people will call it a day and varnish the tin for personal use as it stands but for a tin artist these finished wooded tins are little more then a blank canvas to work upon.
 
The ways we can decorate our tins are limitless and how we build our tins like wise. We will cover some of these ideas and techniques at a later date.
 
Until then I wish you luck in making your own tins, and please drop me a message below to let me know how you got on with your own tin making projects.