Wednesday, 24 April 2019

Wolf Matchstick work tobacco tin.

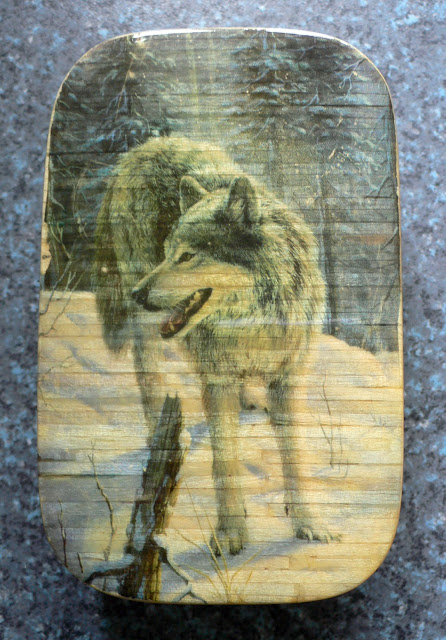
Newly finished  this week and worth showing is this Grey Wolf tin. The transfer used on its lid started life as an old calendar for 2016.The pictures were so good that it felt a pity just to throw them away. They were saved and some were used in making home made transfers one of which found its way onto this tin.


Wolf matchstick work tin lid.
The Grey Wolf on the tins lid is very striking.
 
The tin was made using the traditional matchstick method. The matchsticks on the top of the tin were laid in one direction as the transfer would cover any fancy match work. The base of the tin was given a chequerboard  pattern which reflects light beautifully.
 
Chequerboard matchstick work on base.
Chequerboard matchstick work graces the tins base. 
 
All surfaces of the tin are smooth with no rough edges with a high varnish finish. It's not perfect but then no hand crafted tins ever are.

Tutorial.The birth of a tin part 4.Simple matchwork.

In this tutorial we will start to add a wood covering to our tin. We have three ways to go about this. We could use wood veneer or the more traditional match work or a combination of the two.

Match work is the easiest of the three options so we will run with it and cover wood veneer at a later date.

Some people reading this may already be skilled in applying matches to tins and can lay them in all sorts of fancy patterns but for now we must also assume there are people reading who have never made a tin before so we will be keeping matters simple.


papered tobacco tin
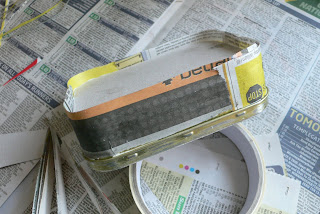
The tin as we left off in our last tutorial

This is as far as we have got with our tin in the last tutorial. It has been covered with paper and lightly sanded to get rid of any lumps and bumps that may stop us laying our matches flush with the tins surface.

The next things we need are matches. Traditionally these would of been used matches either saved or recovered from ashtrays in prison for prison art tins or out of the street or gutter in tramp art. These days it is easier to go to the local toy or model shop and pick up a bag of craft matches for a few quid. At this time of writing 6,000 matches cost around £5.99 and that could be seen as expensive as there are cheaper lots out there. But 6,000 matches could easily cover 3 tins.

Glue. Many modern tin artists use all sorts of glue from 2 part epoxy like Araldite to super glues. Being traditional all we will be using is a strong PVA wood glue. PVA is cheap, clean, easy to use, and washes off easily.


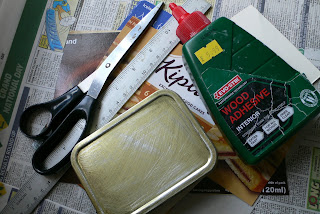
Materials needed for our tin.
Items needed to start laying down the matches.


We can start to lay the matches either at the top or bottom of the tin first or the sides. Laying sides first looks better as the matches on the top and bottom of the tin  hides the ends of the matches that will be visible from the top and the bottom of the tin but it is by far simpler by laying matches across the top and bottom first.

So we will start by laying the matches in the simplest way we can, top first.

To start we mark pen or pencil lines on the lid and base of our tin using a ruler. These are just measurements taken from the top edge, they can be any measurements you like. All they do is give us straight lines to help us lay the matches straight.


Pen lines drawn onto the tins lid.
Drawing lines onto the tins lid.
 
Lines used to keep matches straight.
These lines will help to keep our matches straight.


Choosing one of our pen or pencil lines we then start to lay our matches along it. Further matches are laid along side the ones we originally laid along a chosen pen line, gradually we build out from there. 
 
matches laid staright on drawn linew
Starting to lay the matches along the centre line.
 
Simply place the glue on the tin and smear it out like in the picture above, and place your matches on the tin. Don't worry if a little glue squeezes out from between the matches, this is good and will help to glue match to match. No need to glue every match separately as it takes too long. Notice we have staggered our matches building them up like bricks in a brick wall. This will add a bit of strength to our finished tin.


Laying the matches straight.
Working out from the centre line.
  
 
The above photo shows the progress we have made on the tin lid. Laying of matches on the lid and base is a fairly quick process.
 
Covered tin lid.
The top of the tin has been fully covered.
 
Our lid has been totally covered with matches, next we turn the tin over and start to work on the base.
 
Matches on both top and bottom of tin.
Top and bottom all matched up.
 
The above photo shows both the lid and the base covered in matches. The next process will be to trim the matches back level with the sides of the tin. We need to be careful here as not to cut the matches back too far or badly cut our fingers in the process. So please be careful. Remember to cut away from you and keep your fingers clear.
 
Trimmed back matches on lid and base to tobacco tin.
Matches trimmed back level with the sides.
 
What I will suggest is cut the matches around the top and base longer then required then sand the remaining over hang back with sandpaper using a block to help get a straight edge. 
 
looking at tobacco tin lid.
The tin from the top.
 
 
Now we will look at covering the sides of the tin. Covering the sides is a little more tricky and we have to be more careful. Usually it involves laying a few matches then waiting for the glue to dry enough before we can lay a few more.
  
Laying of matches on the sides or our tobacco tin.
Matches laid horizontally across sides of tin but laid vertically around corners.
 
 
The above picture shows the matches being laid along the flat sides of the tin first. The corners are laid down in the opposite direction so they can easily follow the curve of the tin. Notice the pen marks on the lid which show us where the change of direction of the matches takes place. 


Matching up the tobacco tins lid.
Beginning to lay matches around the edge of the tobacco tins lid.
 
On a modern tin placing of matches along the sides of the lid is a little more tricky. Modern tins usually have two lugs which stick out quite a way. These lugs will stop us laying our matches flat. To get over this problem we cut slots into the matches to take the lugs as in the picture below.


Notched match stick.
Modern tins have lugs sticking out from the sides of the lid. Cutting notches out from the matches helps us to lay the matches flat over them.
 
The following picture shows the tin fully covered in matches. We need to carefully cut away any match that overhangs the lid or base. Again we use a sharp solid knife, and always cut away from ourselves.


Covered tin with match sticks.
Fully covered tobacco tin.
 
matches have been cut back.
Matchsticks have been carefully cut back.
 
The photo above shows the matches cut and trimmed. A useful tip here is to cut the matches slightly longer then needed so we don't cut them below the top and bottom of our tin. We will then sand the matches back along with the rest of the tin to obtain a smoother surface.
 
Sanding itself or lack of sanding all depends on what we are going to do with the final tin and how we want the piece to look in its finished form. This tin may eventually be used for ink work or a home made transfer may be applied. In this case a very smooth surface will be required as any lumps and bumps will show and distract from the finished item.
 
Filling the gaps between matches with wood filler.
Filling the gaps with wood filler.
 
Filling the gaps prior to sanding. This can be done in several ways. In the case of this tin we are using a wood filler, just be careful what colour you use and to match it with the wood you are using. Matchsticks are very close in colour to Ronseal's neutral. Simply apply and rub well into any cracks and gaps you have. The photo below shows the lid and base after filling. Wait for the filler to dry before moving on to sanding.


Gaps betwwen matches have been filled.
The gaps have now been totally filled in.


Sanding matched tobacco tin.
Materials used for sanding back the tin.
 
When sanding it is important to do a good job. For this I use a sanding block and a series of different size grit sandpapers starting with course then gradually working down to fine. It is important to get all the excess filler sanded right back, and the same time be careful to remove any old wood glue which has become smeared onto the tins surface as this will turn white under a coat of varnish and look horrible. Sanding is the key to a good looking tin.


Sanded matchstick tobacco tin.
Our tobacco tin is now ready for what ever design we wish to apply. Fully sanded and looking good.
 
Above can be seen a fully wooded tin, well sanded back and ready for what ever art work or creative spin we wish to give it. Some people will call it a day and varnish the tin for personal use as it stands but for a tin artist these finished wooded tins are little more then a blank canvas to work upon.
 
The ways we can decorate our tins are limitless and how we build our tins like wise. We will cover some of these ideas and techniques at a later date.
 
Until then I wish you luck in making your own tins, and please drop me a message below to let me know how you got on with your own tin making projects.


Saturday, 20 April 2019

An unusual Lattice work tobacco tin.

I have been involved with these tins for many years. Rarely does something turn up that gets me to take a closer look. However recently on ebay this rather crude but unusual tin surfaces.

 Originally it was listed as a  Straw work trench art tin. But closer look at the construction of the tin shows it is constructed of matchsticks and wood veneer. The tin itself with its rolled edges to lid and base squarely puts it as post WW2.Like so many of these tins it would date easily into the latter 60's or even as late as the 80's or beyond.

Depending if the tin was varnished or left uncoated they easily pick up dirt from being handled and kept in peoples pockets.They are also prone to rust easily if left somewhere damp even for a couple of weeks. So what looks like age is no guarantee that it is as old as it seems to first appear. Usually the tins themselves can only be dated by the style of the art work used to decorate it. Which in itself can be a big problem as old designs may persist in the tin making community for many years amongst older participants.

So what made me stand up and take notice?

The match work is common to about 95% of these tins. And using coloured matches or the colouring of matches after they have been applied can be seen on about 20% of the tins. Using wood veneer is much rarer as only a few tin artists tend to use it to partly cover tins or totally cover tins with. But this tin has a very unusual wood veneer Lattice work top to it. It may be very crude in construction but it is very unusual and exciting to see something new.

Lattice work tobacco tin.
An unusual lattice work tobacco tin lid.

You also have to agree the combination of the colours used is also very striking and makes the tin rather eye catching.


Striking coloured matches on base.
A striking alternating coloured red, white and black base
 
A very striking looking base showing the use of the sunken dip which has not been packed out and the combination of alternating red,white and black match work.
 
Art Deco side to tin.
The Art Deco inspired side.
 
 
Again the sides have the striking coloured matches ,however an Art Deco look has been achieved by laying some matches in opposite way to the main match work in a circular pattern.
 
 
Welded gasket and rolled edges to tin.
Inside of the tin showing rolled lips and welded Gasket seal.


This inside of the tin showing the rolled lips to the lid and base and a rubber welded Gasket to help keep a good seal between the base and the lid. Also notice dents to the inside of the lid suggesting the tin was already old and battered before it was covered with matches.

The tin itself is too far gone to reuse it, but as an interesting and decorative piece it has a valid place in any collection.

In the end I could not resist the tin and had to buy it.

Many thanks to the photographer for allowing me to use the pictures with permission.


Sunday, 14 April 2019

Alice in Wonderland,The Mad Hatter Hookah match work tin.

Mad Hatter smoking pipe tin.
Mad Hatter matchstick work tin.

Gosh! this is one tin I would love to own. I just had to post this, and went down on my hands and knees to beg permission to publish the photo here. It's a truly great tin.

Alice in Wonderland was one of the books much loved by the Hippie generation of the late 60's and early part of the 70's.Drugs,sex,and rock and roll were as much a part of the Hippie scene as music, body painting,love ins and protest marches. They were free spirits and this is where the counterculture started which some of us still belong or at least wish we were apart of.

Here we have a tin looking at the drug aspect of the Alice in wonderland story.

I have no doubts in my mind that this tin is a true vintage item. Boy those late 60's and early 70's were heady times. Even if this tin turns out to be from as late as the 1980's it still has the gentle scented breeze of the era behind it. I wonder if the artist was a part of,or connected with the 60's/70's counter culture. Here we see the Mad Hatter sitting on top of a red and white spotted toadstool smoking a  Hookah pipe. White smoke billowing out from under his crooked top hat. The artist was proud enough to sign his or her work and rightly so as this is a fantastic tin.

As with all early tins it has been made using match sticks applied in a cross quarter pattern on the lid. The picture itself looks to be hand drawn in ink and diluted paint and would be sealed in under the varnish.

The artists name is G. Gamble. Did this artist produce any more tins?


Tutorial.The birth of a tin.Papering.Part 3.

In this tutorial we shall look at papering the tin. This is an important step in making the tins, one that most people today seem to forget to do, or leave out because they do not know any better.

Most people will say "Why paper the tin, we won't see the paper anyway as it is hidden under the matches or wood veneer?".

The answer is simple. It will give the wood and glue something to hold onto. Wood glued directly onto a tin no matter what glue we use will quickly crack away. We don't want that to happen after all the work we have done to the tin. It's rather disheartening for a tin we have worked hard on to fall apart especially if we are fond of it and have gotten attached to it.

The paper we can use to cover the tin can be anything from old newspaper to photo copy paper and even old utility bills. I have used all sorts for the job. One of the great things about tin art, most of what we use can be recycled stuff most people would normally throw away.

For this tin I am using an old newspaper.


newspaper for tin.
Cut paper ready to attach to tin.

I tend to start with the edges of the tin, which is also the most tricky part in covering. I cut the paper in strips wider then required. There is a reason for this later on. Take our strong PVA wood glue and smear it on the tin where we wish to place the paper. Then tear off a piece of our paper strip to the length we require. Place it on the tin and with our fingers smooth it down gently getting the paper into all the nooks and crannies. Please be gentle with the paper as when it gets damp or wet it also gets fairly fragile and will easily tear and come apart.

When the paper and glue is dry add another piece of paper, and keep repeating the process until the edges have been covered.

Covering edges.
Sides of tin with paper attached.

When the glue has dried we then need to cut the paper around the edge forming small tabs.We can then fold and glue these flat with the top or bottom of the tin. This is why the paper needs to be a little wider then the depth of the sides.

Cutting tabs.
Cut tabs to allow the paper to easily fold down around corners.


All we have to do is apply glue on the top/bottom around the edge and fold over the tabs so they are flat with the top or bottom.

The next step is to cut a piece of paper and glue it into place on the top or bottom of the tin. This will finish covering the tin. Carefully smooth out any air or glue bubbles that may of formed under the paper if necessary. Don't worry about really small ones as they will usually flatten out when the paper shrinks as it dries.

Paper covered base.
Base of tin papered ready for light sanding.


Above shows the bottom of the tin fully papered. There is one final step before we move on. Once fully dried we will roughly sand the tin lightly to remove any left over rough edges and to try to get a fairly flat surface to glue the wood veneer or matches onto.

The next tutorial we will be applying a traditional covering of matchsticks.

Sunday, 7 April 2019

Tutorial.The birth of a tin.Part 2.

In the first tutorial we looked at prepping the surface of the tin. In this part we now look at what we call "Packing out".

Most tobacco tins have sunken areas that need to be built up before we can start to cover them. This will give us a nice flat top and bottom to our tin and a better surface to decorate at a later date.


The tools required will be a pair of scissors and a good ruler or another item with a good flat edge.
 
We need cardboard. Not corrugated as this will compress down if we apply pressure which is not good and cause our wood coating to crack away and fall off at a later date.
What we really need is good quality compressed card like we can easily find in old cereal packets and cake boxes. This card can easily be glued layer upon layer and form a good solid surface.
 
Firstly we need to cut the card to size so that it fills most of the sunken areas of the tin on the top and bottom. We do not need to be too neat and tidy about this packing. It's only there to fill the dip and help to level off the top and bottom of the tin.
 
 
The glue I prefer is a good quality high resin wood glue. Nothing else any stronger is necessary. All we have to do is to coat areas of the tin we wish to stick the card with the wood glue. Get a good even coating. You can use your fingers if you like to get the glue into all the nooks and crannies. One layer of card may not be enough so you may need to add several. Keep adding pressure to the glued card with your fingers so that it holds nice and flat and does not start to lift up until the glue is tacky enough to hold it down itself.
 
 
Using the flat edge of your ruler you can check for areas that still needs to be built up which are not level with the raised edges of the tin. If needed more card packing may be added until you are happy with the dip in the tin being filled in totally and nice and level.
 
 
The picture above shows the packing in place used to fill in the dip in the lid. The next stage is to totally cover the top and bottom of the tin with a piece of card. This is roughly cut to shape and glued on as before. Don't forget to keep adding pressure with your fingers until the glue has become tacky enough to hold it together.
Once dry the card can be trimmed close to the tin and the edges can be lightly sanded back level with the tins sides.

This completes  Packing Out. In the next tutorial we take a look at applying a layer of paper which will help in holding the wood to the tin.


Tutorial.The birth of a tin.Part 1.

Tobacco tin art starts with the prep work. A good tin will always have a good foundation and this tutorial will show you how to prep your tin and take it to the stage where you can start to build up your tin.

It's surprising just how many modern tin artists forget the prep work that goes into the tin. The prep work is important as it helps the glue stick and forms a good key between the metal and the wood we will be applying at a later date.

The first thing we need is a tin. Tobacco tins are traditionally used so in this tutorial we will be using a modern example which can be purchased for about £1.00.The next item will be rough sandpaper.

 
All we have to do is take the sandpaper and rough up the surface. The sandpaper will partly remove the painted surface of an old tin or the lacquer on a modern tin. The two main things that stops glue sticking.The main thing to try to do is get a good amount of scratches covering the surface. It's these scratches that will help hold the glue when we start to build up.


Below is a close up of the roughed up tin.


Once you are happy with this stage it is time to start to build up the tin by packing out sunken areas. That is a subject for the next part of the tutorial.